ddunn.org
Duane, Dawn,
Sam, Nick, and Mike
(Jessy and Jenny)

Home Up Boating Family Pictures Music


Deck Modifications

  • Anchor Locker
  • 16.5lb Claw on Roller
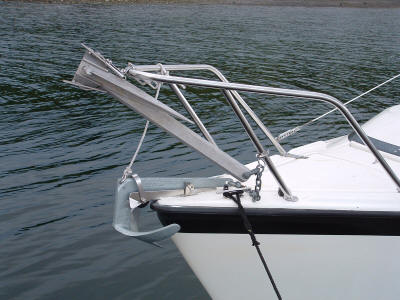
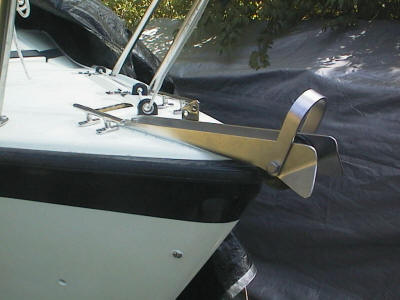
  • Guardian G-16 on Pulpit

    The boat came with a single steel 14 Danforth style anchor that fit in the locker.  Wanting a second anchor I purchased a Guardian G16 Aluminum Danforth style anchor and used a rode left from the old boat.

    This served well for most of the first season as by chance we ended up places with mud and sand bottoms.  On the last trip out we wanted to anchor off Eagle Island.  The bottom there was large gravel and rocks and quite foul.  After three attempts we had to give up and look elsewhere as the light was failing.  Each time the Danforth style anchor was fouled by shell or rock caught in it's flukes.

    I decided that for the second season we needed a more multipurpose anchor selection.  After looking at the Bulwagga and rejecting it because of it's price, I purchased a 16.6 lb Horizon Claw.  This is a Bruce style anchor clone.  I installed a bow roller to carry this anchor.  I already had the Guardian in a bracket on the 
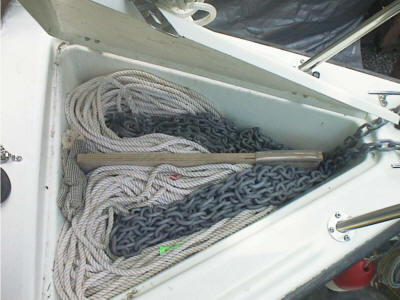
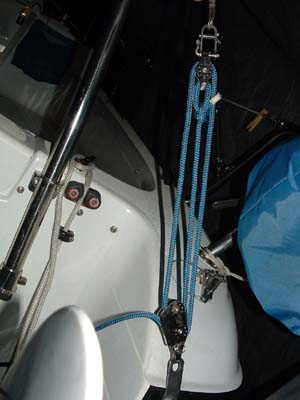
pulpit so I decided to dedicate the anchor locker to rodes only.  Often after two or three nights dealing with two rodes and an anchor in the locker the tangles became a problem.  There was no way to have a quick deploying system with the rodes sitting on top of each other.  
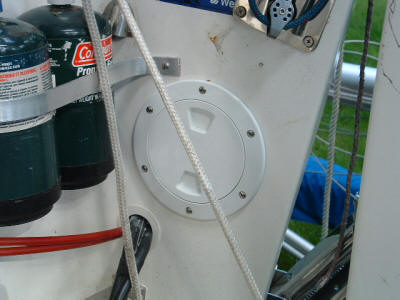
I constructed a plywood divider that is attached to a triangular base in the locker.  Now each rode has it's own space.  I had already cut the front lip of the locker door off to allow the rodes to exit while the door is closed.

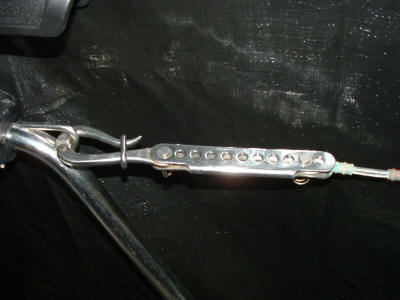
    Just recently I fined tuned the anchor retaining system.  The Guardian in it's bracket is angled so the shank comes back to the first port bow pulpit support.  Using a pipe clamp I attached a snap shackle to the rail.  The anchor shackle simply drops into the fixed snap shackle and the anchor is locked in place.

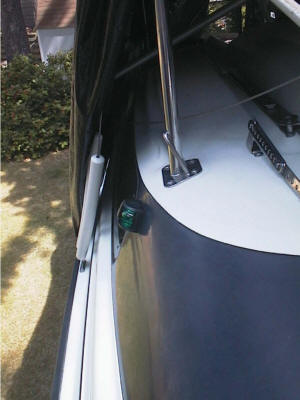
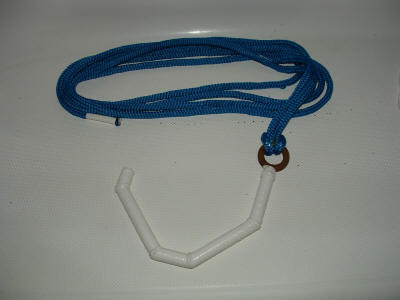
    Since the bow roller I have does not have plate for a pin through the hole in the Claw, I came up with a sliding rope retention system.  A snap shackle is attached to the end of a pennant line.  This line is tied around the pulpit rail with an extended tail exposed.  With the line slid forward you can easily snap the shackle in the anchor hole.  Then you slide the line back and it becomes tight keeping the anchor in place on the roller.  The tail is then tied with a couple of half hitches around the rail support to secure the line in place.
     

  • Relocated Bow Lights

    The original red/green bow light was located right on the tip of the bow. This was a very exposed area for a fragile plastic light.  When the bow roller was added the light had to go.  In the late model boats the light is on a bracket on the pulpit, but with my Guardian anchor already there this location was out.  I decided to take a page out of the power boat books and installed a separate red and green light further back on the cabin top.  The black lights blend right into the black stripe and both look and work well.  Now all the ground tackle and lines up front don't obscure the lights in any way.
     
  • Steaming/Anchor light *new 06*

These are now all on the new mast Arch.  See the cockpit mods.

  • Mast Step Console *new 06*

I built a console that attaches to the mast step for use when we are out mastless.  It holds cups, binoculars, and stuff.  Works well with our West Marine folding seat.

  • Rocker Stoppers *new 06*

Six Davis Rocker Stoppers, 3 to a line now hang underwater on each side reducing the roll of the boat

  • Fender Step *new 06*

    The Fender Step works great from a low dock and the dinghy.

     
  • CDI Furler

    I these pictures you can see the CDI roller furler our 150% genoa is mounted on.  We have a UV strip sewn to the sail to protect it from the sun.  I find this far more convenient than a sock you have to hoist.
     
  • Boom Kicker

    I have also added a boomkicker to support the boom.  I still use the pigtail on the backstay to keep the boom from swinging side to side as the boomkicker supports it.


  • Air Floor Dinghy w/6hp *new 04*

    We recently replaced our previous 8'6" slat floor dinghy with a 9'9" high pressure air floor model.  The new dingy is rated for up to a 15hp motor and has a 1100lb capacity.  It has 5 air compartments and many extra features.  The air floor allows it to easily be rolled up and stored on the bow yet when pumped up to 9psi it is extremely firm and stable.  When inflating and deflating the dinghy on the bow I leave the keel tube empty until the boat is in the water.  This keeps it flatter on the bow and lets you walk inside it.  The keel tube makes a huge difference in tracking. 

    We had a 6hp Yamaha two stroke from our previous boat stored in the shed so we now are able to use this as the dinghy motor.  With the 6hp motor the new boat will plane out at about 12-14 mph depending on the load.  We do still have to get our weight way forward so I might add a set of trim tabs in the future.
     
  • 2 Stage Dinghy Foot Pump

    We bought a special foot pump for the dinghy.  The standard outlet fills the tubes really fast, and the special high pressure outlet tops off the floor to the higher pressure required to make it nice and firm.
     
  • Extended Dinghy Painter

    After last years drifting away dinghy experience we added a longer dinghy painter and a small folding anchor that stores in the dinghy seat bag.
     
  • Trolling Motor Mount *new 04*

    To provide a place to carry the 6hp dinghy motor I installed a stainless steel dinghy bracket on the starboard transom.  It carries the motor easily and can be lowered so the engine can be a backup to the 50hp.  The 6hp will move the boat at 6knots.  I put a lifting harness on the motor and I use the mainsheet attached to the mast carrier as a poor mans crane to lift the motor off the bracket and place it on the dinghy transom.  This makes handling the motor much easier.  To attach the bracket I installed a 6" access hatch so I could get to the nuts inside.  Two inches behind the access hatch in the picture there is another fiberglass panel that also had to be cut through.

     
  • New Tohatsu TLDI 70/90 Motor

    After many years with the old Tohatsu 50 two stroke we had the opportunity to repower the boat with a Tohatsu TLDI 90hp motor.  This is the new generation of two strokes that is much quieter and more fuel efficient.  The sticker on the cowl of the motor identifies it as a 70hp motor but this is just for looks.  Inside are the only two different parts that change a 70 into a 90, the computer, and the intake manifold.  By it's serial number it is also a 90 hp motor.  See the details about the motor change here .


  • Custom Steering

    As part of the motor install we also installed the BWY custom steering package.  This installs a new steering arm with quick release ends.  A bracket is clamped on the main steering arm.  When the motor is connected to the steering it is connected to this bracket.  For sailing, the steering arm can be removed from this bracket an attached to a fixed bracket mounted to the deck.  This keeps the motor locked straight ahead so it will not flop side to side when heeled, and takes the weight of the bigger motor off the steering for better feel under sail.


  • Whisker Pole

    I have a Forespar ADJ 6-12 whisker pole that we use when running downwind wing on wing.
     
  • Dock Hook *new 04*

    My wife always liked the throwable dock hooks we saw at boat shows, but I didn't like the price.  I bevel cut a piece of tubing and welded up a reasonable similarity that works just as well for next to nothing.


  • Aft Lifeline Pelican Hooks

    On the aft lifelines we have SeaDog pelican hooks at the forward ends.  These are able to be attached to the lifelines without being swaged.
     
  • Forward Lifeline Release *new 04*

    I added Keypin shackles at the aft end of each forward lifeline.  This makes it easy to slack the lifeline when raising and lowering the mast.  No longer do the spreaders have to tucked under the lines.  It also is handy to get them out of the way at other times such as when we are lifting the dinghy onto the bow.
     
  • Bow Boat Hook Storage *new 04*

    We found my wife often wanted the boat hook when working the bow, particularly in the locks.  I added a set of rubber blocks with velcro that let the pole be secured to the bow pulpit.
     
  • Adjustable Backstay *new 03*

    When I adjusted the mast rake to where I wanted it the backstay was to short.  Initially I just added a tang to make the adjuster longer.  When we added the full enclosure it became necessary to detach the backstay to feed it through the openings in the bimini.  I then added a small 3 part block and tackle with a jam cleat at the bottom.  On the upper block I put a keypin shackle which makes detaching it easy.


  • Shore Tie Spool *new 04*

    In tight anchorages it is nice to be able to keep the boat parked in one place close to shore.  I added a spool with 400' of 3/8" poly line to the back of the boat.  It fit's perfectly on a dowel I attached to the aft swim step. You drop your anchor in the center of the cove then back into the shore.  Hop in the dinghy and run the shore tie line around a tree or other object and back to the boat.  Many of the parks in BC have rings along the shore just for this purpose.  The line is then cleated off on the stern dock cleats.

    This now mounts in the same rod holder bracket on the new Aft Transom Arch that holds our BBQ table.


  • Motoring Mast *new 07*

    We have made a number of trips without the sailing mast on board.  This allows a very quick launch without all the setup.  However this also leaves behind the forward facing masthead light required when under power.  It also leaves a rather ugly void where the mast belongs.

    To address this I made a 60" tall mast out of two pieces of starboard (Cut from a single 24" x 60" sheet).  The boards cant in and are held together by through bolts with varying length aluminum tube spacers between them.  It mounts to the outside of the mast step enclosing it and cleaning up the look of the deck.  When all bolted together and in place it is a very rigid structure. 

    It has an all around masthead light at the top which is allowed on our small boats as long as the stern light is covered when under way.  It also has a flag halyard and may in the future provide mounting space for other things.  We're looking for some festive signal flags.

    The mast can be folded back for clearance when trailering.


Home | Boating | Family Pictures | Music

 Copyright 2009, Duane Dunn.
All Rights Reserved

CC